Editing images (Photoshop) and creating GIFs
You should always have at least one image in a story.
Your images need to meet four requirements:
- The top image in your story needs to be horizontal
- All horizontal images need to be cropped in the 16:9 aspect ratio
- All horizontal images need to be at least 990px in width (the full width of our content area)
- All images need to be less than 1MB in size (the server will reject larger files)
Alternatives to Photoshop: Try an online service such as (free) Pixlr (like Photoshop) or the simpler PicResize
Using Photoshop CC
- Open a photo from a digital camera or other source
- Crop it
- Rotate the image if necessary (Under the Image menu, choose Image Rotation -> Rotate 90° CW/90° CCW”).
- SELECT the Crop tool
 and choose the 16 x 9 aspect ratio in the Options palette at the top of your screen.
 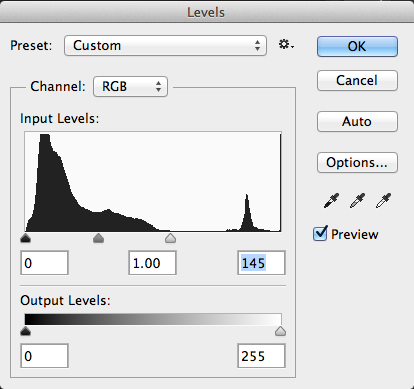 Draw a TIGHT box around the part of the image you want to use and hit RETURN to complete the crop.

- Make it look good
- Under the Image menu, choose: Adjustments -> Levels…
- Click AUTO.
- If the image still isn’t satisfactory, look under Input Levels at the visualization of colours in your image. If the black area looks like a mountain, bring the outside black and white sliders to the base of the mountain. This will make the blacks and whites stand out. If needed, fiddle with the middle grey slider to adjust the mid-range tones.
- Reduce the size
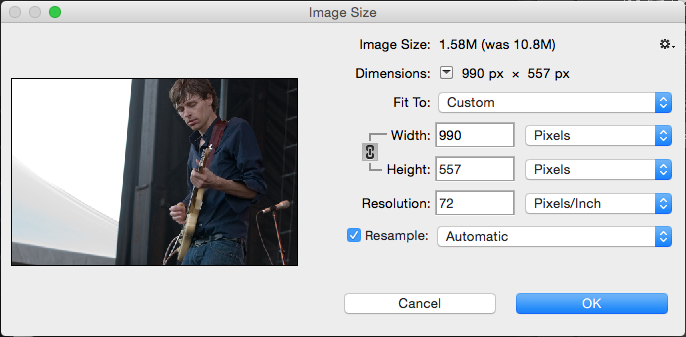 A photo out of your camera is much too big for the web. Go to the Image menu and choose Image Size…
- ENSURE “Resample” has a
 beside it.
 - If the story photo is horizontal:
dimensions -> Width = 990px (height will auto-resize, usually around 557) - Slideshow photos should all have EXACTLY the same width (990px) and height (about 557px).
- Sharpen it (if necessary)
- Sharpening can make an image look more focused by brightening the highlights. Use only if needed.
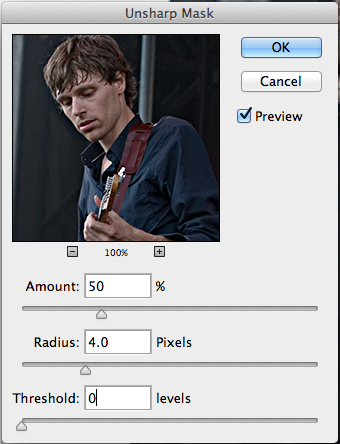 Under the Filters menu, choose: Sharpen -> Unsharp Mask…
- Start with the values shown at the right. Adjust as necessary.
- SAVE AS a JPG
- CHOOSE Save As from the File menu and save it with a new file name. A one-word, lower-case, simple name – no spaces, no punctuation. (Note where you’re saving it to!)
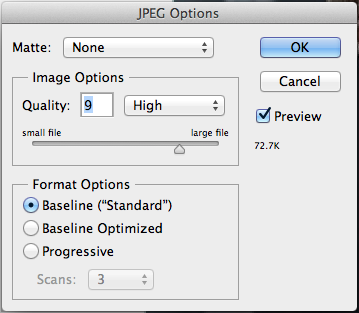
- After you click Save, you’ll be presented with the JPEG Options dialog box. Set Image Options to 9. You’re unlikely to see a visual difference with 10-12, but your file size will decrease substantially, making it a quicker download.
- Make sure Format Options is set to Baseline (“Standard”) .Click OK.
- Keep a copy of your original, high-resolution file in case you have the opportunity to sell it later
Create an animated GIF
Follow these directions to make a GIF in Photoshop.
Free photos
Here are some sites that offer “free” photos. Use them carefully. Some sites have conditions on the use of photos (i.e. crediting the author). Also, when you use the photo, pay attention to the tags to avoid misrepresenting what it is (i.e. don’t say it’s a baby kangaroo if it’s really a wallaby). But take your own images instead! You don’t need to use someone else’s photo of a glass of beer when you can easily take your own.
- Google Image Search (Advanced): Set “Usage Rights” to “Only images labeled for reuse”
- Flickr: At the bottom, search “Only search within Creative Commons-licensed content”
- Wikipedia: Most images associated with an entry are available for republishing under the CreativeCommons licence
- Stock.xchng
- MorgueFile
- FreeDigitalPhotos.net
- Freefoto.com
- CanStockPhoto: Not free — but a big collection, with small and medium sizes costing < $4
More
The Signal podcast
TV shows & webcasts
Follow us on social media
The Signal is produced by senior students at the University of King’s College School of Journalism, Writing & Publishing.
